|
|

Element Pop-up Menu of the Hierarchy Views |

|

|

|
||
Element Pop-up Menu of the Hierarchy Views |
|
|
|

|
|
|
Element Pop-up Menu of the Hierarchy Views |
|
|
|
||
Element Pop-up Menu of the Hierarchy Views |
|
|
|
|
|
|
||
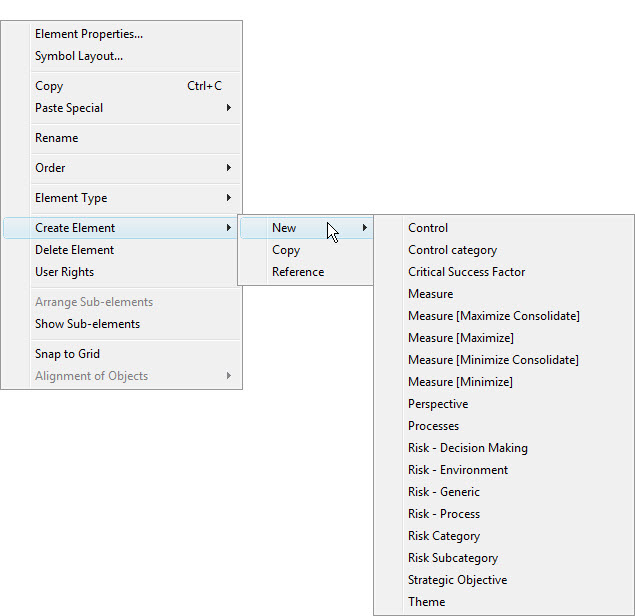
Right clicking an element in the Hierarchy Views opens a pop-up menu, which allows you to configure the element and add new elements, among other things. The contents of the pop-up menu varies according to an element which you have clicked.
Element Properties...: Opens the Element Properties window for configuring the properties of the element.
Symbol Layout...: Opens the Symbol Layout window for configuring element's symbol.
Copy: Copies the selected element(s) to the clipboard.
Paste Special ![]() : This submenu contains options for performing special paste operations from elements located on the clipboard. The Symbol Layout option pastes the symbol layout from the element on the clipboard to all selected target elements. This option is available only if the clipboard contains a single element, i.e. in the case there are multiple elements copied, the Symbol Layout option is disabled. Note that even if the source element is using the element's default layout, the new layout in the target element will be a custom layout, i.e. this option will not change the default layout of the element.
: This submenu contains options for performing special paste operations from elements located on the clipboard. The Symbol Layout option pastes the symbol layout from the element on the clipboard to all selected target elements. This option is available only if the clipboard contains a single element, i.e. in the case there are multiple elements copied, the Symbol Layout option is disabled. Note that even if the source element is using the element's default layout, the new layout in the target element will be a custom layout, i.e. this option will not change the default layout of the element.
Rename: Changes the element's name to editing mode. This option is available only if the element symbol has the element's name included in it.
Edit Description: Changes the element's description to editing mode. This option is available only if the element symbol has the element's description included in it.
Edit Text: Changes the text box over which the pop-up menu was accessed to editing mode. This option is available only if the element symbol or shape has text boxes included in it and the symbol is right-clicked over the text box.
Select Picture: Opens a dialog for selecting a new picture. This option is available only if the element or shape contains a picture item and the symbol or shape is right-clicked over the picture item.
Order ![]() : Opens a menu for adjusting the element's position on the Z (depth) axis. There are four options available: Send to Back (sends the element all the way to background), Bring to Front (brings the element to the surface), Send Backwards (sends the element one step backward), and Bring Forward (brings the element one step forward).
: Opens a menu for adjusting the element's position on the Z (depth) axis. There are four options available: Send to Back (sends the element all the way to background), Bring to Front (brings the element to the surface), Send Backwards (sends the element one step backward), and Bring Forward (brings the element one step forward).
<linked element type>: Opens a window for editing linked elements attached to the element. Examples of linked element types are Vision and Strategy.
Element Type ![]() : Opens a sub-menu for selecting the element type for the element.
: Opens a sub-menu for selecting the element type for the element.
Create Element ![]() : With this sub-menu you can create new elements, copy them and create references to other elements. See Working with elements in the Hierarchy Views for instructions on creating a new element. With the Copy and Reference options you can create copies or references of existing model element under the selected element. See Copies/References Window for more information.
: With this sub-menu you can create new elements, copy them and create references to other elements. See Working with elements in the Hierarchy Views for instructions on creating a new element. With the Copy and Reference options you can create copies or references of existing model element under the selected element. See Copies/References Window for more information.
Delete Element: Deletes the element. See Working with Elements in the Hierarchy Views for more information.
User Rights: Opens the User Rights dialog for the selected element.
Show Hierarchy Views: Shows the selected element in the Hierarchy Views. This option is available only for reference elements and not visible for other elements.
Arrange Sub-elements: Arranges all sub-elements of the selected element. This function is not available if the Arrange Automatically option has been set in the Hierarchy Views pop-up menu. The new element positions affect the View, except for when the model is a replica model. With replica models this function can be used, but the changes are not saved permanently.
Hide Sub-elements: Hides all sub-elements of the element. This option can be used even if there aren't any subelements at the moment. In the case an element without subelements has this option enabled, all subelements added to the element are hidden by default.
Show Sub-elements: Shows all sub-elements of the element.
Snap to Grid: Snaps the element to the grid point nearest to the element's top left corner.
Alignment of Objects ![]() : In the case two or more elements are selected, this submenu provides options for aligning the selected objects. The following options are available in the submenu:
: In the case two or more elements are selected, this submenu provides options for aligning the selected objects. The following options are available in the submenu:
•Left: Align all objects to the left of the the selection.
•Center: Align all objects to the horizontal center of the selection.
•Right: Align all objects to the right of the selection.
•Top: Align all objects to the top of the selection.
•Middle: Align all objects to the vertical middle of the selection.
•Bottom: Align all objects to the bottom of the selection.
•Distribute Horizontally: Distribute the elements within equal distances from one another horizontally. Available only if 3 or more elements are selected.
•Distribute Vertically: Distribute the elements within equal distances from one another vertically. Available only if 3 or more elements are selected.