|
|

Note Modeling Properties |

|

|

|
||
Note Modeling Properties |
|
|
|

|
|
|
Note Modeling Properties |
|
|
|
||
Note Modeling Properties |
|
|
|
|
|
|
||
In the Note dialog, you can define the behavior, the modeling properties, and the custom attribute types of the current model's notes. This dialog can be opened from the Modeling Options dialog by selecting "Note" and clicking the "View" button.
Behavior
The Behavior tab shows the predefined behavior options for the note and all custom element hierarchies in the model.
You can select the desired behavior options for the note by clicking a checkbox next to the behavior option. The behavior options are:
•Group element: a note of this type can be a Group Element.
•Synchronize group instances: when this option is selected, instances of Group Element of this type are synchronized.
•Can belong to a group: a note of this type can be added to a group.
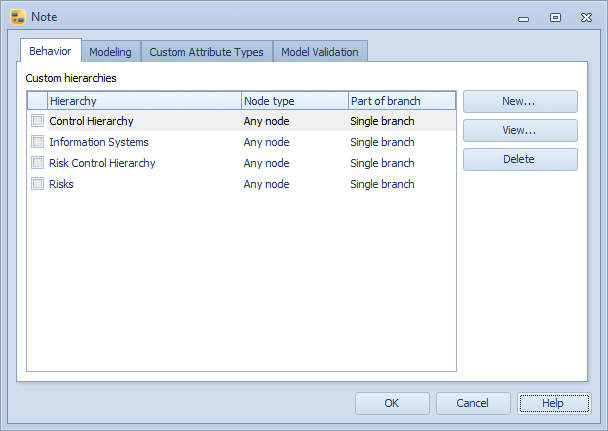
Element hierarchies
The element hierarchies can be used, for example, to model the structure of the process. The element hierarchies are visible in sub-tabs of the Processes tab in QPR Portal. In case the model containing the custom hierarchy is a base model, the hierarchy is published if a note that is a part of the hierarchy is published. The "Custom hierarchies" list shows all the custom hierarchies in the model. The list is used to define element hierarchy behavior for the note type. The list contains four parts:
•Checkbox: selecting a checkbox will make the note type a part of the hierarchy in question.
•Hierarchy: this column lists the names of the element hierarchies in the model.
•Part of branch: the drop down boxes in this column define if the note can be a part of a single branch (i.e. the note can have only one parent element) or multiple branches (i.e. the note can have multiple parent elements).
•Node type: defining the node type as a "leaf node" prevents the notes of this type from having child elements, whereas defining the node type as "any node" allows the notes of this type to have child elements.
To create a new element hierarchy, click the New button. To view and modify the properties of an existing hierarchy, click the View button. Click Delete to delete the selected hierarchy.
Group Relations
The Group Relations tab is visible, when the "Group element" behavior option is enabled. The Group Relations tab used to select which relation type custom attributes are set in the Group Element when an element is added to the group.
Modeling
The selections on the Modeling tab are used to define quick modeling settings:
•Default connector type: defines which connector type is used when a new element of this type is created using quick modeling.
•Horizontal offset: defines the horizontal distance of the created element from the selected element in pixels. Allowed values are 10 to 1000. If the grid is enabled, the offset is rounded up to the next grid size.
•Vertical offset: defines the vertical distance of the created element from the selected element in pixels. Allowed values are 10 to 1000. If the grid is enabled, the offset is rounded up to the next grid size.
The default graphical properties of the note are also shown. Click the Edit... button to modify the graphical properties.
Custom Attribute Types
Custom attribute types can also be defined for Notes. On the Custom Attribute Types page of this dialog, you can add custom attribute types by clicking the "Add" button and remove custom attribute types with the "Remove" button. You can also edit the custom attribute types. To change the order of the custom attribute types, use the upward and downward arrow buttons on the right side of the dialog. You can edit the name of the custom attribute type by typing it into the Name column. The cardinality can also be changed by clicking on the cardinality value and then selecting a new value from the drop-down list (either 1 or N). If you select 1, only one value can be defined for that attribute. If you select N, several values can be defined.
If the Metamodeling Browsing feature has been enabled by your license, the number of elements (of this particular type) having values for the attribute type is shown in its own column. You can view more detailed usage information by clicking the Information... button.
Note dialog
![]()
![]()
Model Validation
On the Model Validation tab, you can define validation rules to help you with model consistency and following a modeling notation. When the check box is filled, the validation definition set in Modeling Options Dialog are used. When the check box is checked, the validation definition on the current element type dialog is used. See the Modeling Options Dialog topic for details.