|
|

Options Dialog |

|

|

|
||
Options Dialog |
|
|
|

|
|
|
Options Dialog |
|
|
|
||
Options Dialog |
|
|
|
|
|
|
||
Settings for using QPR Modeling Client can be changed by selecting Options from the Application menu. The settings are saved file every time they are changed. The new settings will take effect after pressing the OK button and they are also saved and used when QPR Modeling Client is started again.
General Page
On the General page of the Options dialog, the general level settings of QPR Modeling Client can be defined.

Options dialog - General page
Language
Select the desired language of QPR Modeling Client from the Language drop-down list. To configure spell checking options, click on the Spell Check Options... button. The Spelling Options dialog is opened. When the Check spelling as you type check box is selected, misspelled words in active edit fields are underlined.
User interface preferences
Select the "Show Introduction dialog at startup" to see the introduction dialog when starting QPR Modeling Client.
You can select the skin used in all QPR client applications from the "Skin name" drop down menu. The default setting is "QPRBlue". Selecting "<None>" will disable the skinning and make the applications use the native Windows theme. Note that if you have other QPR client applications running when you change the skin, you need to restart those other applications for the setting to take effect in them. User interface modes supported by QPR are the QPRBlue skin and the skinless mode (i.e. "<None>" is selected as the skin). Other skins are provided "as is" and they are not guaranteed to be fully compatible with QPR products.
If you wish to use a custom background image in QPR Modeling Client, select the "Use custom background image" check box and use the Browse button to load the bitmap image. The background image is displayed in the area over which all the views are opened, see the picture below:
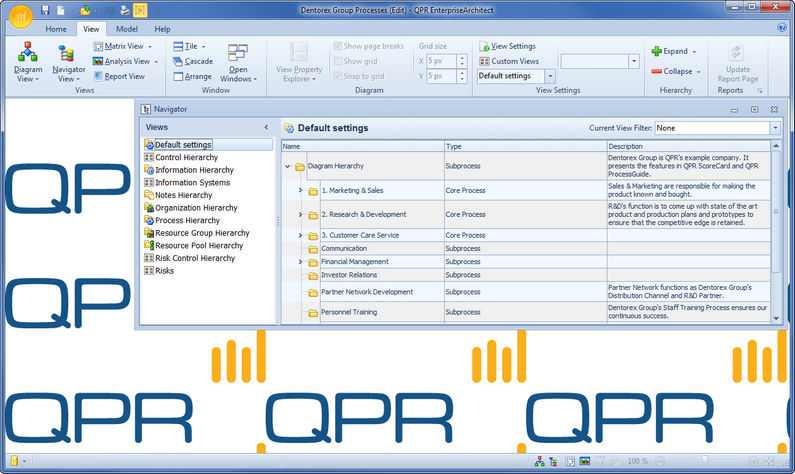
QPR Modeling Client with a background image
Backup file
Select the "Create a backup file when saving" checkbox to generate a backup file for each of your file models. If this option is enabled, a modelfilename.bak file is created when the model is saved. Should the original model ever become corrupted, simply rename the .bak file with the appropriate file extension and you can get the backup copy into use (see the table below for file types of the different QPR Modeling Client editions). The backup file is replaced every time the model is saved, so there is only one backup file at the time unless you copy the old file to a different name before saving the model.
QPR Modeling Client Edition |
Model File Extension |
EAXpress |
qprxpm |
EnterpriseArchitect & ProcessDesigner |
qprdam |
EnterpriseArchitect |
qpream |
![]()
![]()
Server connections
You can define whether a server connection is established automatically when QPR Modeling Client starts by selecting either the "Connect to server manually" or the "Connect to server automatically at startup" option. Click the "Connections..." button to open the Server Connections window, in which you can define what QPR Modeling Client Server entries there are available in the Server submenu in the Application menu.
Modeling Page
In the modeling page you can define whether there is a default template to be used when creating a new model.
![]()
![]() You can also force usage of a certain template with Server models.
You can also force usage of a certain template with Server models.
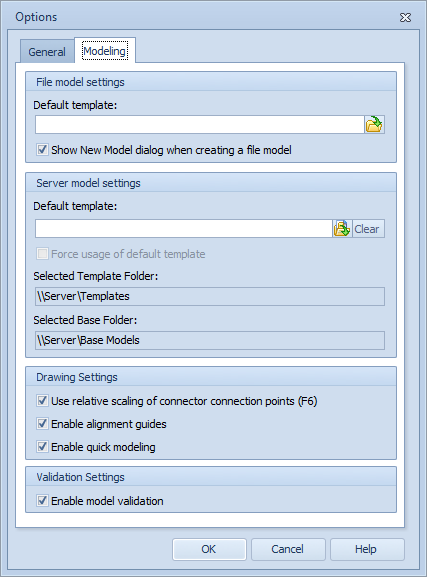
Options dialog - Modeling page
File model settings
You can define a template that will be displayed by default on the New Model dialog. When the default template is set, also the default option on creating a new file model is changed from "Default settings" to "File template". You can also force usage of the default template by removing the check mark from the "Show New Model dialog when creating a file model". If the New Model dialog is not shown, then the default template will be automatically used. If the default template has not been defined and the "Show New Model dialog when creating a file model" option is unchecked, then a file model based on default settings will be automatically created when creating a new model.
![]()
![]()
Server model settings
Administrator users can define a default template that is used when creating a Server model. The template is defined using the Browse... button and can be removed with the Clear button. When the default template is set, also the default option on creating a new Server model is changed from "Default settings" to "Server template". If you enable the "Force usage of default template" option, then the New Model dialog is not shown at all and the template will be automatically used with the new model. This template setting affects all the QPR Modeling Clients connecting to the same QPR BizArchitecture Server, i.e. the Server template setting is global.
The fields "Selected Template Folder" and "Selected Base Folder" display the folders which have been set as the default template model folder and the default base model folder for the server model.
Drawing settings
When resizing diagram elements, you can select to use relative scaling of the connector connection points. When the "Use relative scaling of connector connection points" option is checked, the connector end points are moved to maintain their relative position in the element when the element is resized. If you disable the "Use relative scaling of connector connection points" option, then the end points are not moved when the element is resized. You can also use F6 to toggle between the two drawing modes.
When the "Enable alignment guides" check box is selected, guiding lines are shown when moving an element on the diagram and the element is horizontally or vertically aligned with another element. In addition, the lines show arrows when the elements are equally distributed horizontally or vertically.
When the "Enable quick modeling" check box is selected, quick modeling hotspots are shown around a selected process step, custom element, organization item, note, or store on the diagram. You can toggle this selection also when the diagram view is active by pressing the F4 key.
Validation Settings
When the "Enable model validation" check box is selected, Model Validation is in use. For large models, it is advisable to turn off the validation when opening and/or editing the model, as validation will slow down modeling operations. When the check box is not selected, none of the validation rules are executed and validation warnings are not shown. When re-enabling the model validation, the model that is open is validated completely according to the validation rules and the validation warnings are shown.