Simulation Properties for a Process Step |

|

|

|
||
Simulation Properties for a Process Step |

|

|

|

|
|
|
||
The Simulation Properties for a Process Step dialog has three pages: General, Entry Rules, and Exit Rules

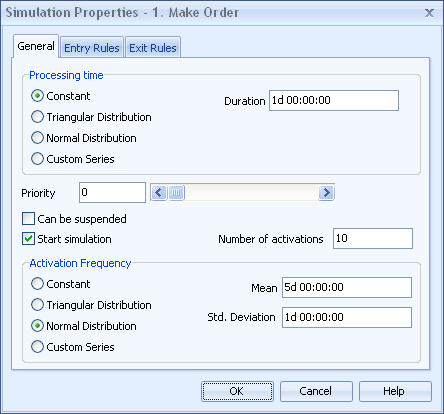
Process step simulation properties dialog , General tab
General
The general page contains information on processing time, priority and suspending and activation of the process step. There are four options to choose from, to define the processing time:
![]() constant
constant
![]() triangular distribution
triangular distribution
![]() normal distribution
normal distribution
![]() custom series
custom series
Constant processing time means that each activation of the process step lasts always for a period specified by the duration. For triangular distribution three values are given: minimum, mean and maximum. Minimum value is the shortest possible processing time, mean is the most common processing time and maximum value is the longest possible processing time. The actual processing time for each activation is then calculated according to this distribution.
For normal distribution the mean value and the standard deviation are specified. Standard deviation specifies the width of the deviation, i.e. how much variation there will be between the actual values and the mean value.
Custom series can be used to define special patterns for processing time. During the simulation the processing times in the series are used in the given order and in cycles: when the end of series is encountered the series is started again from the first value.
All the processing time information is given in a format like 2d 1:40:00 . which means 2 days, 1 hour and 40 minutes.
Priority of the process step specifies its importance. The higher the priority the more important the process step is. A checkbox is provided to indicate whether this process step can be suspended while it is active in simulation and resumed later. A process step can suspend other active process steps, which have a lower priority and take the needed resources from them if the resources are not free. The activation of process steps with lower priority will be resumed later, when the needed resources are free again.
The bottom part of the general page is used for activation information. Process steps can be activated by matching the incoming flows to entry rules or they can also be self-activating. Self-activating process steps start the simulation and they have their Start simulation checkbox checked. If the checkbox is unchecked, only entry rules and incoming flows can activate the process step. If the process step is self-activating i.e. it starts the simulation the number of activations has to be defined. The number of activations defines the number of times the process step is activated during the simulation. Also the frequency of these activations has to be specified. The same distributions as for the processing time are available also for defining the interval between the activations.
Entry Rules
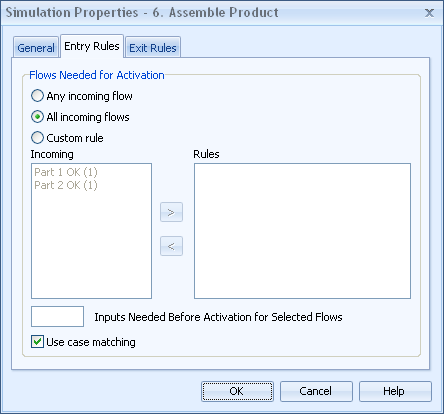
Entry rules are conditions under which the process step will be activated. There are three main conditions:
![]() any incoming flow
any incoming flow
![]() all incoming flows
all incoming flows
![]() custom rules
custom rules
If the entry rule is any incoming flow, any of the incoming flows will activate the process step. The second option is that all the flows have to be present before the process step is activated.
One can also specify how many activations of a particular flow has to enter a process step before it is activated. For example a process step can be made to get activated only when 3 Flow A, 5 Flow B and 2 Flow C activations enter it. Custom rules are combinations of incoming flows, which activate the process step. A new rule is created by selecting the needed flows from the Incoming flows list and clicking the right arrow button. This creates a new custom entry rule. The process step is activated if any of the custom rules is true. A custom rule is true if all the flows listed in the rule have entered into the process step. The left arrow button can be used to delete the selected rule.
The "Use case matching" checkbox at the bottom of the dialog allows you to enable case matching for the "All incoming flows" and custom rules. The case matching means that all the incoming flows must be using the same case in order to activate the process step. If, for example, all the incoming flows are starting flows, they will generate their own cases and therefore the rule will always fail if the case matching is enabled.

Process step simulation properties dialog , Entry Rules tab
Exit Rules
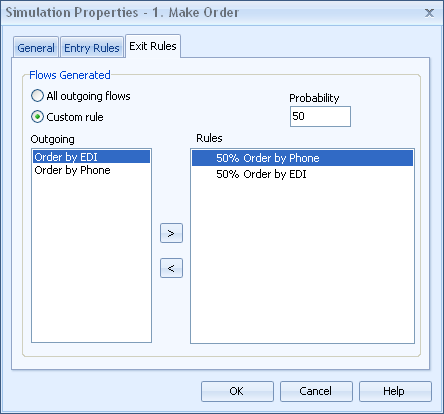
The exit rules page specifies how outgoing flows are sent after the activation of the process step. The options for sending outgoing flows are:
![]() all outgoing flows
all outgoing flows
![]() custom rule
custom rule
If the first option is selected then all outgoing flows are sent every time the activation of the process step is ended. Custom rules can be used to model more complex situations. A new rule is created by selecting the sent flows from the Outgoing flows list and clicking the right arrow button. This creates a new custom exit rule. Also the probability of the combination of flows is specified. The sum of probabilities is always 100 %. If the following exit rules have been defined.
![]() Flow A 20 %
Flow A 20 %
![]() Flow B 30 %
Flow B 30 %
![]() Flow A, Flow B 50 %
Flow A, Flow B 50 %
It means that for 20 % of activations only flow A is sent, for 30 % only flow B is sent and for half of the activations both flow A and B are sent. The selected exit rule can be deleted by clicking the left arrow button.

Process step simulation properties dialog , Exit Rules tab