|
|

Using Information Items |

|

|

|
||
Using Information Items |
|
|
|

|
|
|
Using Information Items |
|
|
|
||
Using Information Items |
|
|
|
|
|
|
||
![]()
![]()
Information items in QPR Modeling Client can be linked straight to specific sections of a larger document. This way different parts of models can have information items linked straight to the relevant chapters of a larger quality document, for example.
Word Document
If the document is distributed as a Microsoft Word document, you can link to specific parts of the document by using bookmarks. To add bookmarks to your document, follow the steps below:
•Go to the place where you want to add a bookmark
•Select Bookmark from the Insert menu.
•Repeat this procedure for all the places where you want to have a direct link.
•Save the document and upload it onto a web server.
•Add the correct links to information items in QPR Metrics and QPR Modeling Client. The links work similarly as HTML anchors, i.e. if you want to create a link to a bookmark called Bookmark in a document called Document.doc, which resides in the www.company.com server, the correct form is http://www.company.com/Document.doc#Bookmark. Note that the bookmarks are not case sensitive, so http://www.company.com/Document.doc#bookmark works as well.
PDF File
Similar functionality with Microsoft Word's bookmarks can be achieved by using the named Destinations in PDF documents. You will need Adobe Acrobat for adding and modifying the destinations. You can add named destinations to your PDF document by following the steps below:
•Select Destinations from the Window menu.
•You need to scan the document before adding destinations. To do this, click the Scan Document button.
•After scanning the document, scroll the PDF to the page where you want to create a destination.
•Select New Destination from the Destination drop-down menu and enter a name for the destination. This name will be the identifier that is used with the search.
•Create Destinations for all the places where you want a direct link. Note that the destinations are case sensitive, so if you create a destination called Instructions, the link to the document must be Document.pdf#Instructions. Document.pdf#instructions opens the document but does not scroll to the destination.
•Save the PDF and upload it onto a web server. A link to a destination in the document can be created according to the example pattern http://127.0.0.1/Document.pdf#destination.
An Example of Creating an Information Item Hierarchy in QPR Modeling Client
In this example we will create information items pointing to a document and different chapters in it. In this tutorial the document will be placed to a web server running on your local computer. However, with actual production models the documents are naturally located on the company server.
These are the steps you need to take:
| 1. | Create a Word or PDF document and add the bookmarks or destinations in the way described above. To utilize this tutorial directly, save the document with the name document.doc and name the bookmarks chapter1, chapter2, and so on. |
| 2. | If you are using Microsoft Internet Information Services web server, copy the document to the C:\inetpub\wwwroot folder (assuming that you are using the default folders). |
| 3. | Test whether the document can be opened with a web browser. Type the URL http://127.0.0.1/document.doc (if you used some other name, replace the document.doc with the actual name of the document) into the browser and see whether the document will open. |
| 4. | In the case the document opened without problems, it is time to create an information item pointing to it: |
| 5. | Start QPR Modeling Client and create a new server model or use an existing one. |
| 6. | Open the Navigator view and view the Information Hierarchy |
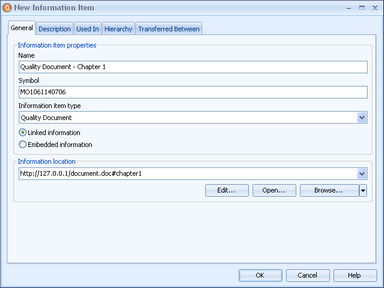
| 7. | Right-click the top level entry (Information Hierarchy - [Model]) and select New Information Item from the pop-up menu. Fill in the values shown in the screenshot below: |

| 8. | Click OK and the information item will be created. Now we need to add links to the chapters in the document. |
| 9. | Right-click the information item you just created in the Navigator view and select New Sub Information Item from the pop-up menu. |
| 10. | Type in the values shown in the screenshot below. The link will point to a bookmark named chapter1. |
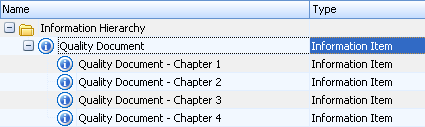
| 11. | Create links to the rest of the chapters in a similar way. The resulting hierarchy should resemble the picture below: |
| 12. | Publish the model. This can be done from the Model tab of the ribbon by selecting Modeling Options -> Server Model Options -> Publish model |
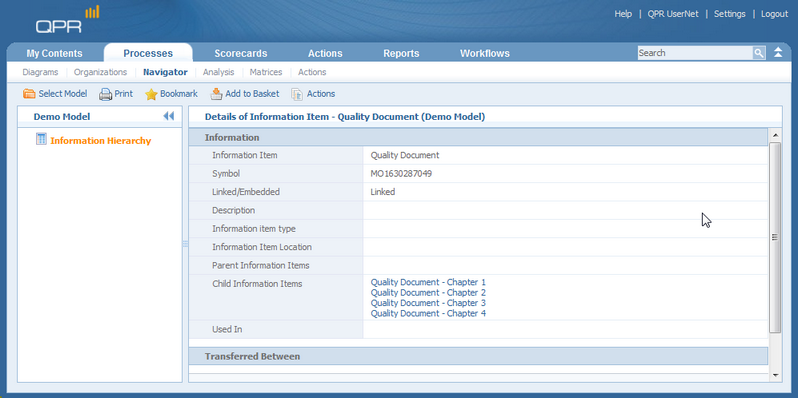
| 13. | Log into QPR Portal, open the Processes tab and open the Info Items hierarchy. A view similar to the picture shown below should be displayed. Now you can open the document by clicking the link in Information Item Location field. In the case you want to open the document straight from Chapter 4, for example, then first click the Quality Document – Chapter 4 link in the Child Information Items field and click the Information Item Location link in the similar detail view that will open. |
Note that in this example the server is 127.0.0.1, which always refers to the local computer. In actual production models you need to replace 127.0.0.1 with the URL of your company's server, www.company.com for example.