|
|

Creating and Modifying Custom Attribute Types |

|

|

|
||
Creating and Modifying Custom Attribute Types |
|
|
|

|
|
|
Creating and Modifying Custom Attribute Types |
|
|
|
||
Creating and Modifying Custom Attribute Types |
|
|
|
|
|
|
||
Creating a New Custom Attribute Type
New custom attribute types are created in the New Custom Attribute Type dialog, which can be accessed by clicking New... on the Custom Attribute Types tab. You can enter name and description for the custom attribute and select the attribute type from the drop-down list.
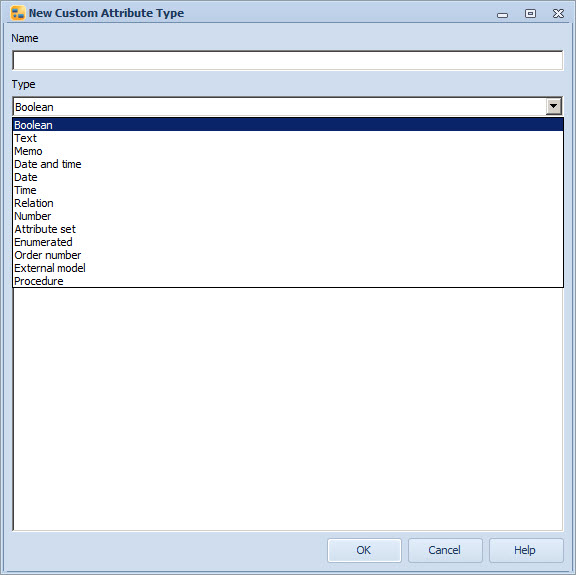
New Custom Attribute Type dialog
For relation, attribute type and enumerated type of custom attributes there are some additional settings available.
Creating Relation Custom Attributes
A relation is made to a selected type of model element and there can be also two-way relations between custom attribute types.
•Select model element type for relation: Use the drop-down list to select the model element type to which the relation should be made. For process steps and connectors also different subtypes are listed separately. If you select "All element types", the relation can be set between elements of all element types by using relation connectors, grouping, or by attaching interface elements in a diagram, or by dragging and dropping in a custom relation hierarchy Navigator view.
•Two-way link: You can choose to establish a two-way link to another relation and have the relations updated automatically (i.e. when linking relation A to relation B, also relation B gets the link to relation A automatically) when the link is established. Note that you cannot establish two-way links between base model and child model element types. The relations listed in the drop-down box are those that are relations to the element type for which the custom attribute is added. In the case the element type of the relation has been defined to be a generic process step or a connector, the relation is available for all subtypes of the more generic class, but in the case a subtype is selected, the relation is available only for the subtype in question.
Creating Attribute Set Custom Attributes
An attribute set is a collection of predefined custom attributes that can be set to an element type. An attribute set can include other attribute sets so the custom attributes can be inherited also from another attribute set.
When creating a new attribute set, select the attributes for the set from the list of available attributes on the right side of the dialog. Use the < button to move the attribute to the list of attributes in the set. To remove an attribute from the set, use the > button. You can also create new attributes by selecting New... and then moving the attributes you created using the < button to the set. You can change the order of the attributes using the up and down arrow buttons next to the list. This sub-attribute order is used in all places in the user interface where sub-attributes are listed.
To remove an attribute type, select it and click Delete. A confirmation is asked before deletion.
You can define cardinality for the attributes in the attribute set. The cardinality defines whether the custom attribute can have one or several values defined. The supported values are 1 (only one value can be defined) and N (several values can be defined).
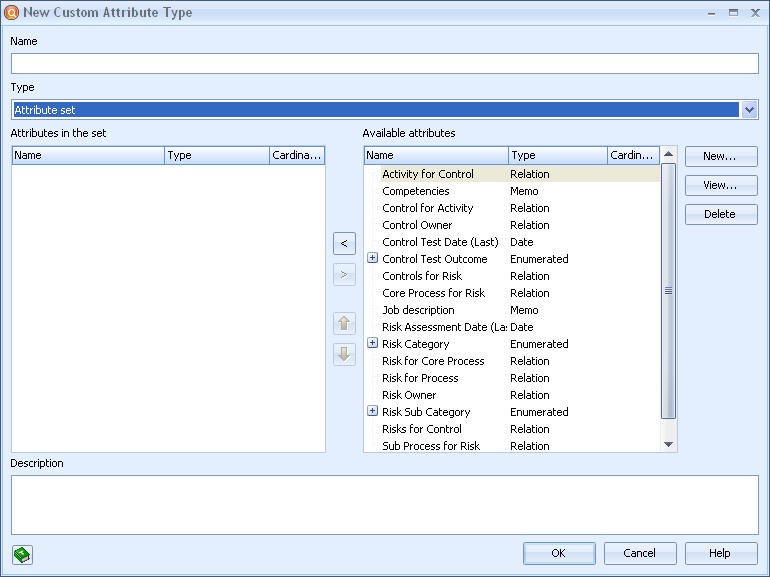
New Custom Attribute Type dialog for an attribute set
Creating Enumerated Custom Attributes
An enumerated attribute consists of a set of predefined textual values. Additional attributes can be linked to each value. These additional values become available for the element when the enumerated attribute has that value.
When creating a new enumerated custom attribute type, you have to define the values for the custom attribute. Select Add to add a new value for the type. It will be added as the last type in the list. You can type the value directly to the field. To modify the properties of the enumerated value, select the value and click View..., or double-click the value. In the window that is opened you can edit the name and description of the value, and link additional attributes to the enumerated value by selecting them from the list of available attributes and and clicking the < button. You can also change the order of the values by using the up and down arrow buttons next to the list.
To remove an enumerated value, select the value and click Delete. A confirmation is asked before deletion.
You can also select an image for the enumerated value. This image will be shown in the element in the diagram instead of showing the value as string. To select an image, click Browse... in "Image for enumerated value". The image can be a wmf, bmp, gif, png, jpg, or XML file. (For information about the XML file definition, see the 'Customizing Element Symbols in QPR Modeling Client Using XML' topic in QPR - Developer's Guide.) Select the file and click Open. To remove the image, click Clear. To change the scaling of the image, either type the desired scale percentage into the Scale combo box, or use the arrows in the combo box to set the scaling. The value can be between 10 and 200, and the default is 100. To preserve the aspect ratio of the selected image, check the Preserve aspect ratio checkbox.
Creating Procedure Custom Attributes
A procedure custom attribute consists of a QPR Modeling Client script that can be run via the element pop-up menus on the Diagram or Navigator views. The procedure custom attribute type can be assigned a Default procedure value which will be used if no value is defined for the custom attribute.
You can also select an image for the procedure value. To select an image, click Browse... in "Image for value". The image can be a wmf, bmp, gif, png, jpg, or XML file. (For information about the XML file definition, see the 'Customizing Element Symbols in QPR Modeling Client Using XML' topic in QPR - Developer's Guide.) Select the file and click Open. To remove the image, click Clear. To change the scaling of the image, either type the desired scale percentage into the Scale combo box, or use the arrows in the combo box to set the scaling. The value can be between 10 and 200, and the default is 100. To preserve the aspect ratio of the selected image, check the Preserve aspect ratio checkbox. This image can then be added to the graphical properties of the element to which the custom attribute type is attached. After that, when right-clicking the image on the diagram, a pop-up menu listing all the procedures for the custom attribute is displayed. A procedure can then be executed by selecting it from the list. In addition, if the procedure attribute's script contains the <NAME> tag, the name is shown as the menu item with a possible value index (e.g. "Procedure(1)") when the attribute has multiple values. For information about writing scripts, see the QPR - Developer's Guide.
Modifying Custom Attribute Types
Custom attribute types are modified using the Modify Custom Attribute Type dialog, which can be accessed by selecting the custom attribute type you wish to modify from the list (on the Custom Attribute Types tab of Modeling Options window) and clicking the View... button. The dialog is otherwise similar to the New Custom Attribute dialog, but the custom attribute type cannot be changed. The name and description, however, are modifiable as well as two-way link and cardinality settings with relations.
When modifying attribute sets, you can add or remove attributes in the same way as when creating a new attribute set (see section
"Creating Attribute Set Custom Attributes" above). You can also edit the names of attributes in attribute sets by typing the name directly to the Name column and change the cardinality by clicking on the cardinality value and selecting a new value from the drop-down menu (1 or N).
For enumerated type attributes, you can change the order of the attributes values by using the Move Upwards and Move Downwards buttons. To add new values, click Add and type in the value. To remove a value, select it and click Delete. You can also modify the properties of the enumerated value by selecting the value and clicking View...
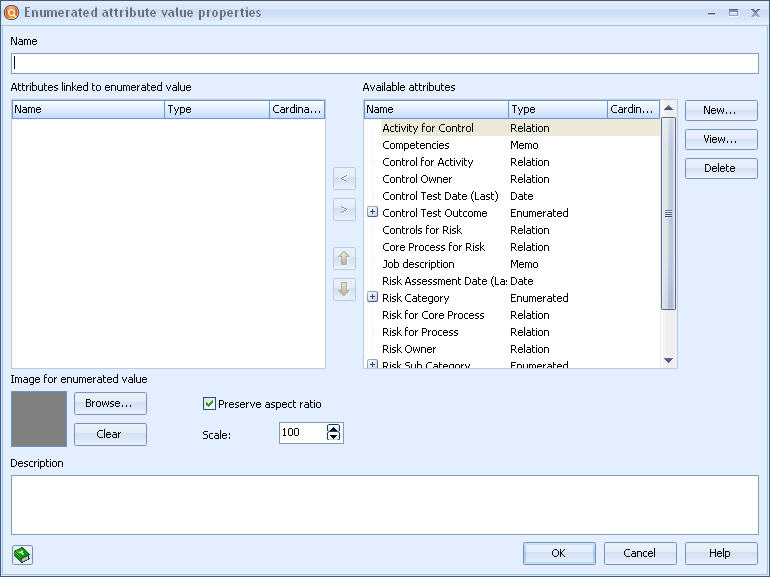
Modifying enumerated custom attribute value properties dialog
To change the type of the custom attribute, you need to create a new custom attribute type and delete the old one.