|
|

Installing the Servers package |

|

|

|
||
Installing the Servers package |
|
|
|

|
|
|
Installing the Servers package |
|
|
|
||
Installing the Servers package |
|
|
|
|
|
|
||
Follow the instructions below to install QPR Suite 2017.1 Servers:
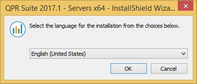
1. Choose Setup Language |
|
Start the installation by selecting the language for the installation wizard from the drop-down list. Note that the software itself may have more languages available (see the packing slip or readme for more details) than what are offered for the installation wizard here. |
|
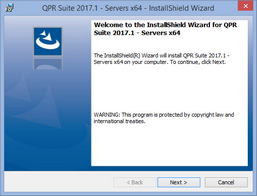
2. Welcome Page |
|
This is the starting point of the QPR Suite 2017.1 Servers installation wizard.
Click Next to continue. |
|
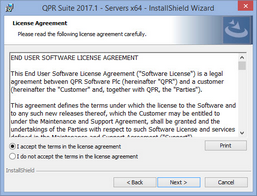
3. License Agreement |
|
Here you can see the End User Software License terms for the software that is about to be installed. You will need to accept these terms before continuing the installation. Select "I accept the terms in the license agreement" and click Next to continue in the case you accept the license terms. Otherwise you'll need to cancel the installation. |
|
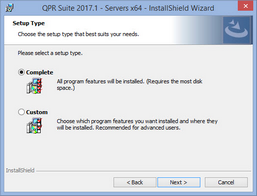
4. Setup Type |
|
Here you can choose between Complete installation or Custom installation. The Complete installation installs all server components, while the Custom option lets you choose the components to install. With the Complete option, click Next and proceed to step 6. With the Custom option, click Next and proceed to step 5. |
|
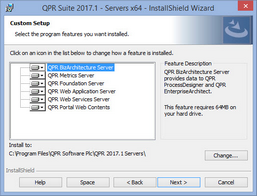
5. Custom Setup |
|
Select the features that will be installed. You can also change the destination folders here for various components. However, all features except for QPR Portal Web Contents use the same destination folder, so changing the destination folder for one of the features affects the others as well. It is advisable to leave the QPR Portal Web Contents destination folder to its default value in this dialog, as its location will be determined in the forthcoming dialogs.
Once you have the desired set of features selected, click Next to continue. |
|
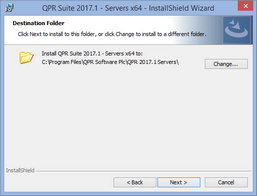
6. Choose Destination Folder |
|
Define the folder which will be the installation root folder for the QPR Suite 2017.1 Servers package. This folder will contain the executables and libraries required to use the software. By default the folder is C:\Program Files\QPR Software Plc\QPR 2017.1 Servers.
You can also select whether the application is installed for all users or only for yourself. In the case you are doing a server installation as a service, select the "all users" option.
Click Next to continue. |
|
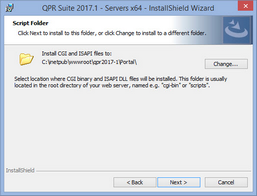
7. Choose Script Folder |
|
*This step is skipped if you are using Microsoft Internet Information Services.
Here you need to define the location of your web server's CGI binary/script directory. This folder will contain the CGI binary and script as well as ISAPI DLL files required by QPR Portal. With Apache the default script folder is cgi-bin under the Apache installation folder, and it is recommended that you create a version-specific sub-folder such as qpr2017 under it.
After defining the script folder, click Next. |
|
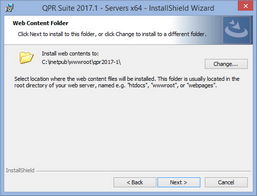
8. Choose Web Content Folder |
|
Here you need to define the location of your web server's web contents directory. If you have Microsoft Internet Information Services installed, the folder will be detected automatically and the web contents will be placed in a qpr2017-1 sub-folder under that folder. With Apache the default web content folder is htdocs under the Apache installation folder, and it is recommended that you create a version-specific sub-folder such as qpr2017-1 under it.
After defining the folder, click Next. |
|
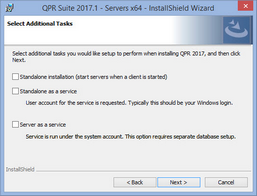
9. Select Additional Tasks |
|
In this dialog you can choose additional features that will be installed. The options available are:
•Standalone installation. Selecting this option configures the software so that also servers are started when a client (QPR ProcessDesigner, QPR EnterpriseArchitect, or QPR Metrics) is launched. LocalDB will be installed when you choose this option. •Standalone as a service. Selecting this option makes the server components to be run as a Windows Service. LocalDB will be installed when you choose this option. In the case you select this option, you can choose whether the service is started during Windows startup. You will also be asked for the user account under which the service is run. It is typically your Windows login. Enter the username in format <domain>\<username>. You can use the character "." as a shortcut to identify your local computer instead of <domain> if you're using a local account. Note that the user needs to have the "Log on as a service" rights in order for the service the be started successfully. This option cannot be used simultaneously with the "Standalone installation" or "Server as a service" options. •Server as a service. This option is mainly for server installations, and makes the server components to be run as a Windows Service. In the case you select this option, you can choose whether the server is started during Windows startup. This option requires that there is a separate database available. |
|
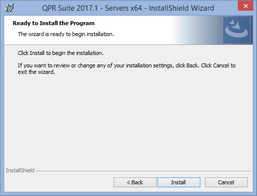
10. Ready to Install |
|
The installer is now ready to start copying the application files to the computer. If you need to change any settings, click Back and make the necessary changes.
Once you are satisfied with the settings, click Install to start the installation. |
|
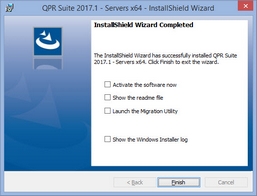
11. Complete |
|
The installation is now complete. Check the "Activate the software now" if you wish to launch the QPR Product Activation Wizard after clicking Finish. Similarly, checking the "Show the readme file" checkbox opens the readme file after you click Finish. In addition, if an older qualifying QPR installation was found on the computer, there is also a "Launch the Migration Utility" option available on the last page. Selecting that will open QPR Configuration Manager into the System Migration section after clicking Finish. If you have multiple options selected, the corresponding operations are performed one at a time, i.e. the readme file is displayed after finishing the activation and the migration utility is not launched before the readme file is closed.
|
|
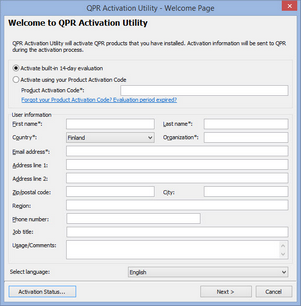
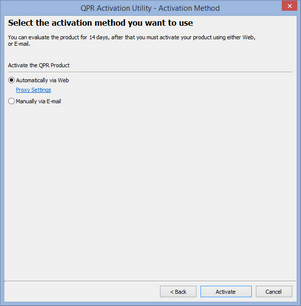
12. Activate the Product |
|||||
In the case you selected the "Activate the software now" option, the QPR Activation Utility is launched and you can activate the software by following the instructions below:
|
|
||||
|
|
||||