Options Window |

|

|

|
||
Options Window |

|

|

|

|
|
|
||
The Options window can be opened from the ![]() QPR Metrics Options button in the Application menu, or in the classic style menu, from the Tools
QPR Metrics Options button in the Application menu, or in the classic style menu, from the Tools ![]() Options menu or by clicking the Options
Options menu or by clicking the Options ![]() button on the classic style toolbar. The Options window contains the General, Application Server, and Report settings of QPR Metrics.
button on the classic style toolbar. The Options window contains the General, Application Server, and Report settings of QPR Metrics.
General Settings
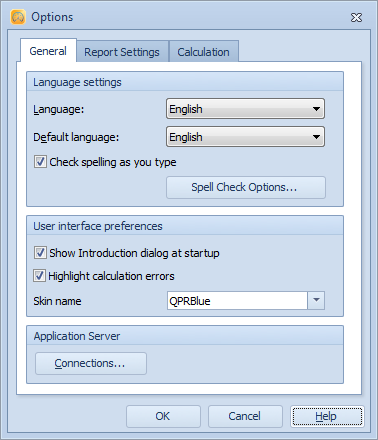
In the General tab of the Options window you can define the language settings and user interface preferences.

To set your preferred language, select it from the Language drop-down list. To set the default language for all new users of the program, select it from the Default language drop-down list. The Default language setting decides the language which QPR Metrics will use when new users log in for the first time.
Note: This setting applies to QPR Metrics client only. The Default language for the Web Client can be set in the QPR Web Application Server configuration.
The Language setting overrides the Default language setting, i.e. the Default language will be used until the user changes the language for him/herself. The program's default value for both settings is English.
Note: The default language for the Web Client can be set in the QPR Portal Plugin Configuration utility (accessible from the Plugins page of the WAS Configuration utility).
Clicking the Spell Check Options... button will open the Spelling Options window, where spell checking options can be configured. When the Check spelling as you type check box is selected, misspelled words in active edit fields are underlined.
Select the "Show Introduction dialog at startup" to see the introduction dialog when starting QPR Metrics.
Select the "Highlight calculation errors" option to have elements and scorecards containing erroneous formulas highlighted in red in Model Navigator frame and the Scorecard Navigator view.
You can select the skin used in all QPR client applications from the "Skin name" drop down menu. The default setting is "QPRBlue". Selecting "<None>" will disable the skinning and make the applications use the native Windows theme. Note that if you have other QPR client applications running when you change the skin, you need to restart those other applications for the setting to take effect in them. User interface modes supported by QPR are the QPRBlue skin and the skinless mode (i.e. "<None>" is selected as the skin). Other skins are provided "as is" and they are not guaranteed to be fully compatible with QPR products.
Click the "Connections..." button to open the Server Connections window for defining QPR Metrics Server connections.
Report Settings
To change the Report Settings:

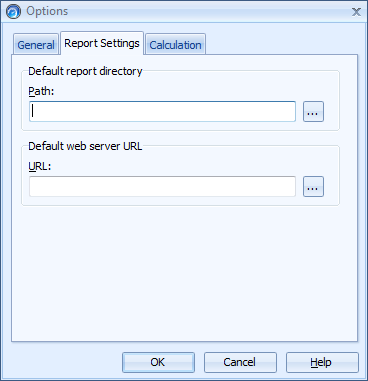
To specify a default report directory, type the path of the directory in the Path field or browse it by clicking the ![]() button. This is the directory where the reports will be located.
button. This is the directory where the reports will be located.
To specify a default Web Server URL, type the URL address in the URL field or browse it by clicking the ![]() button. This is the location where the published reports will appear.
button. This is the location where the published reports will appear.
Calculation Settings
Here you can define settings for calculation.

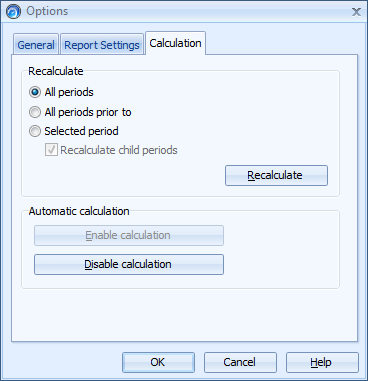
To recalculate all periods of the model, select the All periods option in the Recalculate section and click the Recalculate button.
To recalculate all periods that end before a certain date, select the All periods prior to option in the Recalculate section, pick the desired date from the drop-down calendar and click the Recalculate button.
To recalculate a certain period, select the Selected period option in the Recalculate section, select the desired period from the drop-down list and click the Recalculate button. If the Recalculate child periods check box has been checked, then all child periods of the selected period will be recalculated as well.
To disable automatic calculation for the model, click the Disable calculation button. In the case the calculation is disabled, measure values are not updated automatically for instance to upper level measures when you change values of a lower level measure. As a result, measure values are not consistent when calculation is disabled. However, disabling calculation can significantly increase performance when updates are made to large models. To enable calculation again, click the Enable calculation button. It is also advisable to click the Recalculate button after enabling calculation to bring the measure values up to date. Automatic calculation settings toggled here are in effect while the QPR Metrics Server is running. After the server is restarted, the calculation settings are reset to the values provided by QPR_Servers.ini configuration file.
Click OK to apply the changes that you have made to your program options.