|
|

|
Working with Status Options |

|

|

|
||
|
Working with Status Options |
|
|
|

|
Working with Status Options
|
|
|
Working with Status Options |
|
|
|
||
|
Working with Status Options |
|
|
|
|
|
|
||
You can add, delete and modify status options in the Status Options Window.
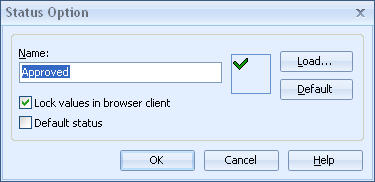
Status Option Window
Adding Status Options
To create a new status option:
| 1. | Click the New button in the Status Options window. The Status Option dialog opens. |
| 2. | Enter the name of the status into the Name field. |
| 3. | Icon of the status option is displayed to the right of the Name field. To select a new icon image, click the Load button. To revert back to the default icon, click the Default button. |
| 5. | If you want this status to prevent the values from being edited in QPR Portal (for example, with the Approved status), check the Lock values in browser client option. |
| 6. | If you want to make the current status to be the default status for new measure values, check the Default status checkbox. If the default status is used, a series using the status control will get the default status for its values as soon as values are input or imported. Setting this option clears the default status flag from the previous default option (if there was one). |
| 7. | Click OK to confirm the settings and create the option. Clicking Cancel closes the dialog without committing any changes. |
Modifying Status Options
To modify a status option:
| 1. | Select the desired option from the list and click the Properties button. The Status Option dialog opens. |
| 2. | The name of the option can be modified in the Name field. |
| 3. | Icon of the status option is displayed to the right of the Name field. To select a new icon image, click the Load button. To revert back to the default icon, click the Default button. |
| 5. | If you want this status to prevent the values from being edited in QPR Portal (for example, with the Approved status), check the Lock values in browser client option. |
| 6. | If you want to make the current status to be the default status for new measure values, check the Default status checkbox. If the default status is used, a series using the status control will get the default status for its values as soon as values are input or imported. Setting this option clears the default status flag from the previous default option (if there was one). |
| 7. | Click OK to confirm your changes and update the option. Clicking Cancel closes the dialog without committing any changes. |
Deleting Status Options
To delete a status option:
| 1. | Select the desired status option from the list |
| 2. | Click the Delete button. |