|
|

XML Import |

|

|

|
||
XML Import |
|
|
|

|
|
|
XML Import |
|
|
|
||
XML Import |
|
|
|
|
|
|
||
![]()
![]()
QPR Modeling Client can import XML data into a model, providing that the XML data is in a correct format. This wizard can be opened from from the Model tab of the ribbon by clicking the Import XML button.
The following lists the main features of QPR Modeling Client XML Import:
•Definition of information for the import. QPR Modeling Client model elements and attributes are defined in XML import settings file. The import settings file can also include selection criteria i.e. criteria of the exact model element attribute values that selects the imported model elements.
•The XML settings file is a normal Windows initialization file with the extension '.pgt'. Setting files are easy to create and edit. The detailed structure of integration settings file is explained in a separate document, the QPR Developer's Guide.
•QPR Modeling Client installs predefined settings file in C:\ProgramData\QPR Software\QPR 2017\2017.1\Clients\PGIntegrationTasks folder. These predefined integration tasks are shown in import wizard's list box.
•QPR Modeling Client administrators can create their own settings files to perform a variety of different integration tasks. With the Import Wizard, the user can select and execute these tasks easily. QPR Modeling Client model element and attribute names that can be used in settings file are described in QPR Developer's Guide.
•With the Import Wizard, it is also possible to select an XSLT file to execute transformation from some other XML format to QPR XML format. These eXtensible Stylesheet Language Transformation files are powerful tools to transform UML (XMI), ebXML, XML used by project management tools, etc to QPR Modeling Client XML. More information about XSLT can be found at http://www.w3c.org.
The structure of XML file to be imported must follow the QPR XML format. The XML format is fully explained in the QPR Developer's Guide.
Note that importing a model with a changes log bigger than 1 MB is not supported.
Using the XML Import Wizard
In the first step of the XML Import Wizard you can define which elements and attributes are imported by selecting from the different settings options. Choose whether to use an existing settings file (file type '*.pgt') or to use one of the predefined settings. If you select to use predefined settings, you can choose from "Import all", "Import measure data", "Import names and descriptions" and "Import resources". If you select "Import all", for example, then all elements of the model will be imported.
Once you have selected the import settings, click Next > to continue to the next step.
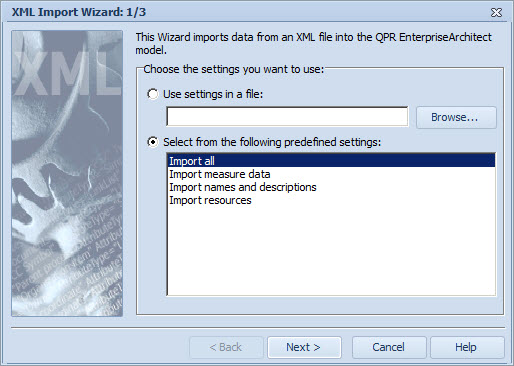
Selecting the import settings
In the second step of the XML Import Wizard, define the name and location of the XML file to which the model data will be imported. The import file can either be a new file or an already existing file. You can enter the location and name either manually or by clicking the Browse... button.
If you wish to use an XSLT file (file type ' *.xsl ') rather than the QPR standard XML format, you can define the file's location and name in the lower field. Again, you can enter the location and name either manually or by clicking the Browse... button.
Once you have completed the file definition(s) in this step, click Next > to continue to the next step.
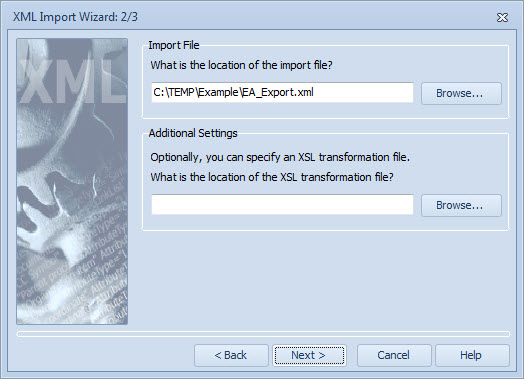
Selecting the location of the import file or the XSL transformation file
In the third step of the XML Import Wizard, select the import mode. By selecting Replace Only, only attribute values are updated, providing that the element is found in the model. New attribute values are set for existing elements, but custom attributes are not created. Replace and Create option creates new elements for the elements that are not found in the model. Existing attributes are updated and possible custom attributes (such as missing attribute types, enumerated values and sub-attributes) are created. With Create All option all imported elements are created as new elements for the model. Possible ID conflicts can be avoided by ignoring the import ID's or by resolving relations in the model.
Once you have completed selecting the import mode in this step, you have completed the wizard and you can click the Finish button to execute the XML import. If you wish to return to the previous steps to view or modify your previous selections, click the < Back button.

Selecting the import mode
You will receive a confirmation stating whether the import was completed successfully. In the case the import was incomplete, you will see a list of errors. Most common errors are missing values and incorrect formats in the XML that is being imported. Once the import is completed successfully, your model will contain the imported information embedded in the way defined in step 3.
Note |
If you are importing XML into a Server model (that is not in read-only state), the model has to be saved before the import in order for the import to function correctly. A message box will appear stating that the model will be saved. |