QPR Knowledge Base 2019.1
There are two approaches to defining relations between elements:
•Using relation custom attributes
•Using relation elements
Defining Relations by Using Relation Custom Attributes
First, create the relation custom attribute:
1.In the Modeling Options dialog, create a new Custom Attribute Type.
2.Give a name to the custom attribute. Think of this name as the type of the relation.
3.From the Type drop-down menu, select "Relation".
4.Click OK.
Next, add the created custom relation attribute to an element type:
1.In the Modeling Options dialog, open the element type dialog of the element type to which you want to add the custom attribute.
2.On the Custom Attribute Types tab, click Add.
3.Select the custom attribute type that you first created and click OK.
4.Select the Cardinality for the custom attribute type, i.e. whether to allow only one value or several values for the custom attribute.
5.Click OK.
Lastly, create the relation connector:
1.In the Modeling Options dialog, create a new Connector Type.
2.On the General tab, give a name for the connector type.
3.On the Behavior tab, select either the "Relation (single occurrence)" or the "Relation (multiple occurrence)" check box.
4.On the Relation tab, select the start and/or end element types you want the connector to be able to connect to and the relation you want the connector type to set, i.e. the element type to which we added the created relation custom attribute and the created relation custom attribute.
5.Click OK.
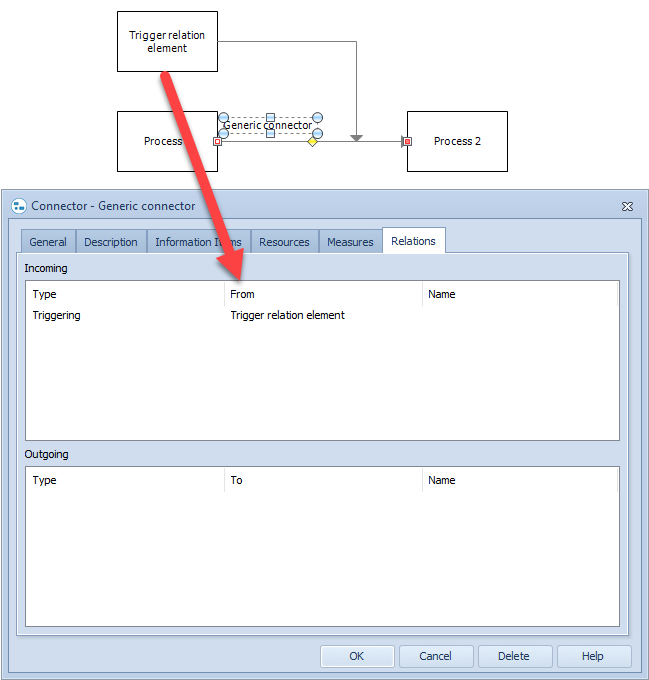
After this, when you connect two elements of the type to which you added the relation custom attribute with the relation connector, the value of the relation custom attribute will be set:

Defining Relations by Using Relation Elements
First, create the relation element:
1.In the Modeling Options dialog, create a new Element Type.
2.On the General tab, give a name for the element type. Think of this name as the type of the relation.
3.On the Behavior tab, select the "Relation" check box. This will make the element a relation element.
4.On the Behavior tab, you can select other behaviors too, according to your needs.
5.Click OK.
Next, create the relation element connector:
6.In the Modeling Options dialog, create a new Connector Type.
7.On the General tab, give a name for the connector type.
8.On the Behavior tab, select the "Generic connector" and "Relation (element)" check boxes.
9.On the Relation tab, select the relation element type you first created.
10.Click OK.
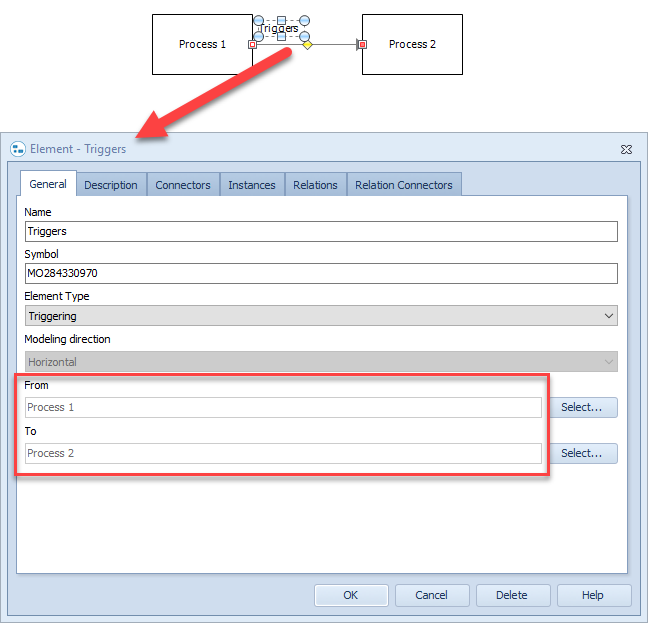
After this, when you connect two elements on a diagram using the relation element connector, a relation element will be connected to both of the elements. The relation element will be visualized as a connector, and the "From" and "To" fields in the properties of the relation element itself show the relation:
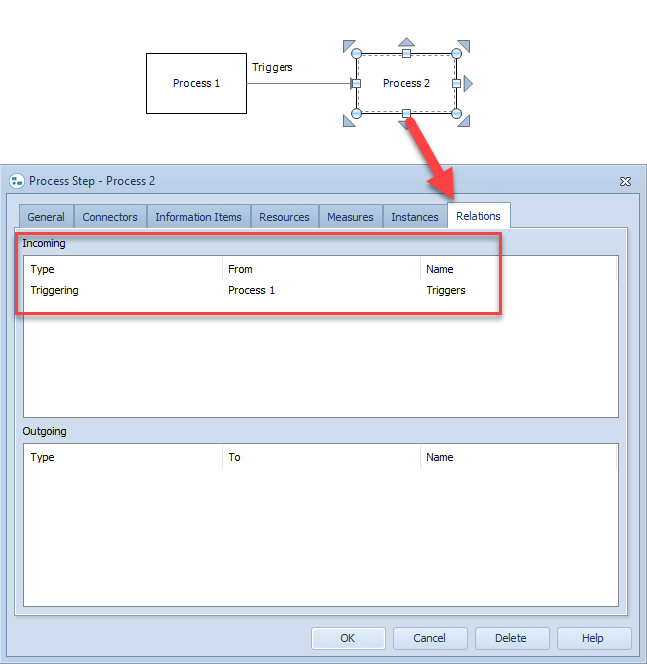
In addition, the relation connectors will be shown in the "Incoming" (as shown in the picture below) and "Outgoing" sections in the Relation tab of the properties of the connected elements:
If the relation element type has the "Allow element creation on diagrams" behavior set, the relation element can also be visualized as an element on the diagram and a relation connector can be used to connect the relation element to other elements (here it is connected to the "Generic connector" element):