|
|

Linked Elements Window |

|

|

|
||
Linked Elements Window |
|
|
|

|
|
|
Linked Elements Window |
|
|
|
||
Linked Elements Window |
|
|
|
|
|
|
||
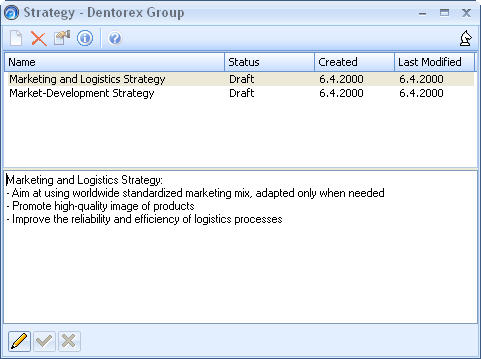
In this window you can master linked elements of a same type connected to an element. The window consists of four parts: toolbar, element list, text field and bottom bar. The linked element type and the parent element are displayed in the window's title bar: <linked element type> - <parent element>.
The Toolbar
![]()
The following functions are available at the toolbar:
|
Create a new linked element. |
|
|
Delete a linked element. |
|
|
Change properties of a linked element. |
|
|
Open the Information Item window. |
|
|
Open the QPR Metrics User's Guide. |
The Element List
All linked elements of a same type of the parent element are listed here. You may select an element from the list by clicking it with the left mouse button. Double-clicking will open the properties window for changing linked element properties.
The Text Field
You can change the text properties of a linked element to create more impact, and thus facilitate communication.
![]()
When the text field is activated with the Edit button, ![]() , of the bottom bar, text formatting toolbar appears above the text field. The toolbar contains the following functions:
, of the bottom bar, text formatting toolbar appears above the text field. The toolbar contains the following functions:
|
Font selector. Select the font to be used with the drop-down list box. |
|
|
Font size selector. Select the size for the font using the drop-down list box. |
|
|
Toggle bold text. |
|
|
Toggle italic text. |
|
|
Toggle underlining. |
|
|
Select color for the text. The Color Window will open for selecting the color. |
|
|
Align text to the left. |
|
|
Align text to the center. |
|
|
Align text to the right. |
You can select the font and font size. You can also use bold, italic, underlining or color to highlight your text and right-align, center or left-align it.
Note: Keep in mind that all fonts may not be displayed correctly in the Web Client. Therefore you should test that the selected font will work properly.
To edit the text of the linked element, click the Edit button ![]() of the bottom bar. To save your changes, click Accept changes button
of the bottom bar. To save your changes, click Accept changes button ![]() . To cancel, click Cancel Editing button
. To cancel, click Cancel Editing button ![]() .
.
Bottom Bar
With the bottom bar you can edit the text of the linked element and confirm or cancel any changes made. The bar contains the following functions:
|
Edit text. Click this to edit the text. |
|
|
Accept changes made to the text. |
|
|
Cancel editing. |
Creating a New Linked Element
To create a new linked element:
| 1. | Click the New <element type>, |
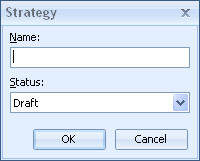 |
| 2. | Enter name for the linked element into the Name field. |
| 3. | Select a Status for the linked element from the drop-down list box: Draft, Proposal, Accepted or Obsolete. |
| 4. | Click OK button. |
Deleting a Linked Element
To delete a linked element, select an element from the element list and click Delete <element type> , ![]() , button. A confirmation dialog appears. Answer Yes to confirm the deletion.
, button. A confirmation dialog appears. Answer Yes to confirm the deletion.
Editing a Linked Element
To edit a linked element:
| 1. | Select an element from the element list. |
| 2. | Click Show Properties , |
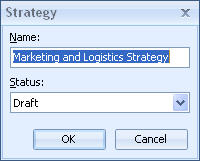 |
| 3. | Edit the properties and click OK to save the changes. |
See Also