|
|

Create New Model |

|

|

|
||
Create New Model |
|
|
|

|
|
|
Create New Model |
|
|
|
||
Create New Model |
|
|
|
|
|
|
||
The first step in building a model, is to create the new model. This can be done as follows:
| 1. | In the Application menu, click the New button |
| 2. | In the Name field, type a descriptive name for your model. |
| 3. | In the Based on drop-down list, you can select to base your new model on: no model, one of the model templates or on any previously created models. |
| 4. | In the Reply address for e-mail notifications field, you can enter the e-mail address to which users of the e-mail notification system can reply to. You can also leave the field empty if you want to use the default reply address set in the QPR Configuration Manager utility. |
| 5. | In the Description field, you can enter any additional descriptive information about the model. |
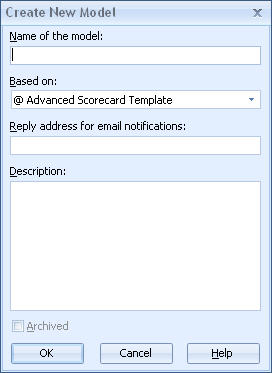 |
| 6. | Click OK and the Scorecard Explorer window opens. |
If the created model is not based on any other model or template, then the Scorecard Explorer opens showing the element "Scorecard" that is created by default. As well, two default element types are created: Top Element and Measure.
As with all model properties, the reply address for e-mail notifications can be modified later in the Model Properties window. The model can be archived only later in the Model Properties window, so the Archived checkbox is always disabled in this window.
Developing a New Model
Developing a model of your organization can be a long-term process. However, getting started is quite straightforward.
The main steps to take to start developing a new model are as follows:
| 1. | Create the model. |
| 2. | Define the element types and linked element types you want to use. |
| 3. | Define the value settings, series and ranges you want to use. |
| 4. | Define the period levels and periods you want to use. |
| 5. | Create scorecards. |
| 6. | Create elements. |
| 7. | Define element properties. |
These steps are just a guide. You may choose to proceed in a different manner such as, defining all of the scorecards of your model before you begin defining any types. Or, if you are using a model template, some of these steps may already be completed for you. These model templates, which are basically partially-made models, can provide you with a set of the most commonly used model definitions.
Adding New Scorecards to a Model
Expanding your model by adding new scorecards into your model is best executed using the Scorecard Explorer window.
The Model Navigator frame of the Scorecard Explorer contains all of the scorecards of your model. Using the Scorecard Explorer, you can view a tree structure of your model. If you have not previously added any scorecards to your model, then the Scorecard Explorer window displays only one default scorecard, called "Scorecard". This scorecards is at the root of the tree structure.