|
|

Resource Dialog |

|

|

|
||
Resource Dialog |
|
|
|

|
|
|
Resource Dialog |
|
|
|
||
Resource Dialog |
|
|
|
|
|
|
||
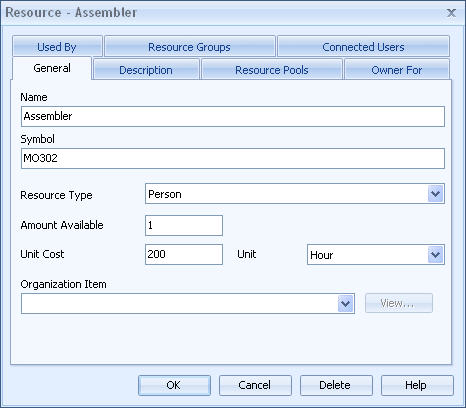
The Resource dialog is used to show properties of one resource and its connections to other model elements. A resource dialog can be accessed from the Navigator view, by right-clicking the desired process step and selecting Resource Properties... from the pop-up menu. Also, the Resource dialog can be opened from the Resources dialog, the Process Step dialog or the Connector dialog.
Connection to the organization item is shown in a drop down list. To change the connection you can select some model element from the list of the drop down list. There are also two special items in the list: empty and new. If you select the empty item, e.g. [Empty], the connection is emptied. If you do not find the needed organization item in the list you can create a new one by selecting the new item, e.g. [New organization item]. An Organization Item dialog for creating this organization item is shown.
The Resource dialog has the following pages: General, Description, Resource Pools, Owner for, Used by, Resource Groups, Connected Users (![]()
![]() only) and Custom Attributes (when the resource contains custom attributes).
only) and Custom Attributes (when the resource contains custom attributes).
![]()
![]() In the case multilingual modeling has been enabled, click the
In the case multilingual modeling has been enabled, click the ![]() button to open the Translation dialog for adding translations for different languages. You can translate items which are inputted into the model, i.e. items such as element names, flow names, resource names, etc. The
button to open the Translation dialog for adding translations for different languages. You can translate items which are inputted into the model, i.e. items such as element names, flow names, resource names, etc. The ![]() button opens the translation dialog with the translatable strings of the current tab included. Note that the fields display the values of the currently selected modeling language, i.e. in the case translation has not been provided for the active modeling language, the fields are empty.
button opens the translation dialog with the translatable strings of the current tab included. Note that the fields display the values of the currently selected modeling language, i.e. in the case translation has not been provided for the active modeling language, the fields are empty.
General
The General page shows name, symbol, resource type and organization item of the resource. For material resources the following fields are shown: units available, unit cost, unit name, store size, ordering limit, order size, ordering cost, ordering time. For other resources only amount available, unit cost and unit are available. These fields are not shown for resources, which are resource groups or pools, as these values will be calculated according to resources allocated or attached to them. All these properties can be modified. The symbol is a unique identifier for the resource. When a new resource is created, QPR Modeling Client will assign it a unique symbol by getting the model object id and adding "MO" to its beginning. It is also possible to edit the symbol. Allowed characters in the symbol field are alphanumeric characters in upper case and lower case.
Description
On the Description page, a large memo field for showing and editing description is shown.
![]()
![]() Note that you can use also HTML formatting in the description, but the formatting is visible only in QPR Portal.
Note that you can use also HTML formatting in the description, but the formatting is visible only in QPR Portal.
Resource Pools
The upper part of the Resource Pools page shows all the resource pools to which this resource belongs and the lower part shows all the resources that belong to this resource. The Add and Remove buttons can be used to modify these relations. When at least one other resource belongs to this resource, the resource becomes a resource pool.
Owner for
The Owner for page shows all the process steps and connectors for which this resource has been specified as an owner. Only person resources can be owners.
Used by
The Used in page shows all the process steps and connectors to which this resource has been allocated. These allocations can be changed using Add and Remove buttons.
Resource Groups
The upper part of the Resource Groups page shows all the resource groups to which this resource has been allocated and the lower part shows all the resources that have been allocated to this resource. Add and Remove buttons can be used to modify these allocations. When at least one other resource is allocated for this resource, the resource becomes a resource group. When allocating resources to a resource group also the amount allocated must be specified.
![]()
![]()
Connected Users
When connected to the QPR BizArchitecture Server, the Connected Users page will also appear in this dialog. From this page users can be added to and removed from the current resource. When a user is added to the resource, then that user is connected to the resource and therefore has it listed on his/her "My Elements" page of the QPR Portal.
Custom Attributes
In the Custom Attributes tab, you can manage the values of custom attributes and view the descriptions of selected attributes. This tab is visible only if custom attributes have been defined for resources. To define a value for the listed attribute, you can just type in the value directly to the field. The values for Boolean and enumerated attributes are selected from a drop-down list. You can also add new values for the attribute by selecting Add if the custom attribute is allowed to have several values (the attribute has cardinality N).
You can use the Remove button to remove individual values from attributes that have cardinality N. The button is enabled only when an attribute with cardinality N is selected in the list.
To clear the value of the selected attribute, select the Clear button. If the value is an attribute set, the action clears all sub-values of the attribute set. If the attribute is an attribute with cardinality N, it removes all values from that attribute.
For memo and relation attributes, you can use the Modify button to edit the values. Then a new window is opened where you can edit the values, or in the case of a relation attribute, Select Model Elements for Relation is opened for selecting the model element.
Resource dialog
Click the OK button to commit any changes you have made or click Cancel to close the window and abandon any possible changes. Click the Delete button to delete the resource. A confirmation is asked before the resource is deleted. Click the Help button to open the User's Guide.