|
|

Process Step Dialog |

|

|

|
||
Process Step Dialog |
|
|
|

|
|
|
Process Step Dialog |
|
|
|
||
Process Step Dialog |
|
|
|
|
|
|
||
The Process Step dialog is used to show properties of one process step and its connections to other model elements. The Process Step dialog can be accessed from the Diagram view and the Navigator view by right-clicking the desired process step and selecting Process Step Properties... from the pop-up menu.
The main process level has the same set of properties as process steps. The Process Step dialog for the main process level can be accessed from the Diagram view by right-clicking the main process level element and selecting Set Model Properties... from the pop-up menu, and from the Navigator view by right-clicking the main process level element and selecting Process Step Properties... from the pop-up menu. By default, the main process level is the default subprocess type but you can change it to any subprocess process step type. You cannot delete the main process level.
Connections to other model elements are shown in drop down lists. To change the connection you can select some model element from the list of the drop down list. There are also two special items in the list: empty and new. If you select the empty item, e.g. [Empty], the connection is emptied. If you do not find the needed model element in the list you can create a new one by selecting the new item, e.g. [New person]. A model element dialog for creating this model element is shown.
The process step dialog has the following pages: General, Version (when the process step is a diagram), Attached Elements (when the process step has attached elements allowed), Connectors, Information Items, Notes, Changes Log (when the process step is a subprocess), Resources, Measures, Custom Attributes (when the process step contains custom attributes), External Model (when the process step type is External Model), and Interface (when the process step is a cross-model interface).
![]()
![]() In the case multilingual modeling has been enabled, click the
In the case multilingual modeling has been enabled, click the ![]() button to open the Translation dialog for adding translations for different languages. You can translate items which are inputted into the model, i.e. items such as element names, flow names, resource names, etc. The
button to open the Translation dialog for adding translations for different languages. You can translate items which are inputted into the model, i.e. items such as element names, flow names, resource names, etc. The ![]() button opens the translation dialog with the translatable strings of the current tab included. Note that the fields display the values of the currently selected modeling language, i.e. in the case translation has not been provided for the active modeling language, the fields are empty.
button opens the translation dialog with the translatable strings of the current tab included. Note that the fields display the values of the currently selected modeling language, i.e. in the case translation has not been provided for the active modeling language, the fields are empty.
General
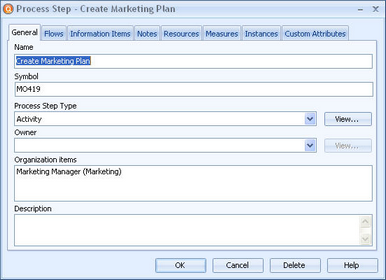
The General page shows the name, symbol, type, modeling direction, organization item and its process level, owner and description of the process step. All these properties except organization item and its process level can be modified. The symbol is a unique identifier for the process step. When a new process step is created, QPR Modeling Client will assign it a unique symbol by getting the model object id and adding "MO" to its beginning. It is also possible to edit the symbol. Allowed characters in the symbol field are alphanumeric characters in upper case and lower case. Note that the type cannot be changed from subprocess type to non-subprocess type if you have created model elements in the subprocess level, or if the model element is the main process level element. The properties of the selected process step type and the owner can be viewed and modified using the appropriate View button. The organization items (if such exist) are also displayed on this page. The bottom of the page is used for a memo field for showing and editing description.
![]()
![]() Note that you can use also HTML formatting in the description, but the formatting is visible only in QPR Portal.
Note that you can use also HTML formatting in the description, but the formatting is visible only in QPR Portal.
Version
The Version page shows version info for the element. This tab is visible only when the selected element type has the diagram behavior enabled.
![]()
![]() Note that in the case you insert valid e-mail addresses to the author field, the address(es) defined here will receive e-mail notifications for QPR Portal actions connected to the process level. You can add also multiple e-mail addresses separated by a comma.
Note that in the case you insert valid e-mail addresses to the author field, the address(es) defined here will receive e-mail notifications for QPR Portal actions connected to the process level. You can add also multiple e-mail addresses separated by a comma.
To enable the tracking of version information, select the "Use Version Information for Current Diagram" option. You cannot disable the version information for the main diagram level.
Changes Log
The Changes Log page shows the changes done to basic properties such as name, description, and process level of the process step. The changes are logged similarly as in the log included in the Model Version Dialog with the exception that only those changes that occur in the corresponding subprocess are shown. This tab is visible only when the selected process step is a subprocess.
Attached Elements
The Attached Elements page shows a list of elements that have been attached to the process step. This tab is visible only if attached elements have been enabled for the process step.
Connectors
On the Connectors page the incoming and outgoing connectors are shown in separate lists. In the case of a subprocess, the listed connectors are those connected to the subprocess itself as well as all input and output flows found in the process levels below the subprocess in the hierarchy. Connectors cannot be modified on this page. The incoming list shows data in the following format 'Source element (source diagram) -> connector'. The outgoing list shows data in the following format 'connector -> Target element (target diagram)'.
Information Items
The Information Items page shows the information items attached to this process step. The lower part of the page shows the description of the selected information item, which cannot be edited. Information item can be added, modified and deleted using the Add, View and Remove buttons. Double-clicking an information item in the list opens the selected information item at the location, which has been specified in the information item properties. With the Default button you can define what information item will be opened if you have set Information Item as the link destination in the Web Style dialog.
Notes
The Notes page shows all the notes connected to this process step. The lower part of the page shows the description of the selected note. The description on this page cannot be edited. Notes can be added, modified and deleted using the Add, View and Remove buttons.
Resources
The Resources page shows the allocation of resources for the process step. The resources allocated are shown in a sheet with a column for specifying the amount of each resource allocated to the process step. Add button can be used to allocate more resources to the process step. The selected resource can be viewed and modified by clicking the View button. The Remove button removes the allocation for the selected resource.
Interface
Interface Mapping
See Interface Mapping.
Measures
The Measures page shows measures connected to the current process step. The lower part of the page displays the "Values of the selected Measure" section, which shows values for all cases for the currently selected measure in the current process step. These values can be entered and edited. For inputting values, new measures can be connected to the process step by clicking the Add button. The selected measure can be viewed and modified by clicking the View button. All values of the selected measure connected to this process step can be deleted by clicking the Remove button.
Furthermore, if the process step is a subprocess, then you can also select the Subprocess calculation method for the subprocess. By default the calculation method used for all subprocesses is that which you have selected in the Measure dialog. To use a method other than the default for the current subprocess, select the desired method from the drop-down list. The Subprocess calculation method cannot be selected for the main process level.
Instances
The Instances page lists all the process levels (in alphabetical order) in which an instance of the current process step exists. To open the selected process level and view the instance, click View. To delete the instance from the selected level, click Delete. If there is only one instance of the process step, you cannot delete it.
Custom Attributes
In the Custom Attributes tab, you can manage the values of custom attributes and view the descriptions of selected attributes. This tab is visible only if custom attributes have been defined for process steps. To define a value for the listed attribute, you can just type in the value directly to the field. The values for Boolean and enumerated attributes are selected from a drop-down list. You can also add new values for the attribute by selecting Add if the custom attribute is allowed to have several values (the attribute has cardinality N).
You can use the Remove button to remove individual values from attributes that have cardinality N. The button is enabled only when an attribute with cardinality N is selected in the list.
To clear the value of the selected attribute, select the Clear button. If the value is an attribute set, the action clears all sub-values of the attribute set. If the attribute is an attribute with cardinality N, it removes all values from that attribute.
You can click the View button to open the element properties dialog of the selected element. The button is enabled only for relation type custom attributes that have the relation defined.
For memo and relation attributes, you can use the Modify button to edit the values. Then a new window is opened where you can edit the values, or in the case of a relation attribute, Select Model Elements for Relation is opened for selecting the model element.
Process Step dialog
Click the OK button to commit any changes you have made or click Cancel to close the window and abandon any possible changes. Click the Delete button to delete the process step. A confirmation is asked before the element is deleted. Click the Help button to open the User's Guide.
![]()
![]()
Model Validation
On the Model Validation tab, you can define validation rules to help you with model consistency and following a modeling notation. When the check box is filled, the validation definition set in Modeling Options Dialog are used. When the check box is checked, the validation definition on the current element type dialog is used. See the Modeling Options Dialog topic for details.