Values Tab |

|

|

|
||
Values Tab |

|

|

|

|
|
|
||

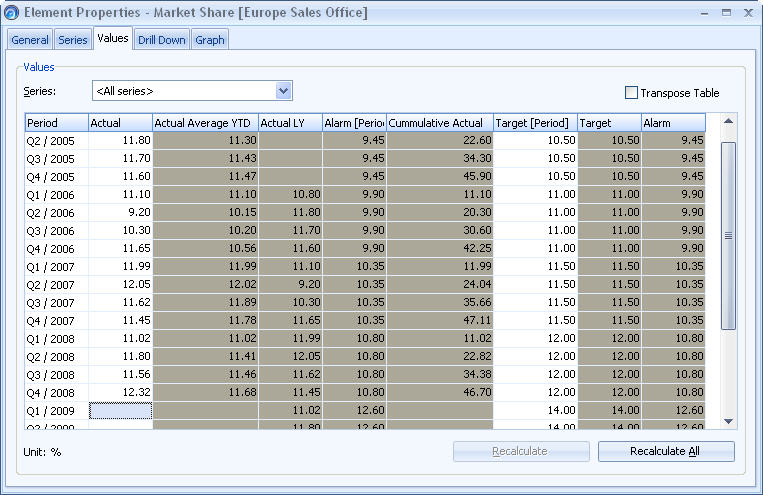
In the Values tab, the values of the element's series can be viewed and edited. Each series belonging to the element is listed in the Series drop-down box. The values of the selected series are listed below the drop-down box. You can select to view only one series by selecting the name of the series from the drop-down menu. Alternatively, you can list either all series or all series which do not have a formula as their input type, i.e. only the editable series.
Inputting Values
Values can be input in the following way:
| 1. | Select the row (or column if the Transpose Table checkbox has been checked) of the desired period in the window. If you want to switch the table to be presented so that the periods become the table's columns and the series become the table's rows, check the Transpose Table checkbox. The Transpose Table setting affects QPR Metrics client only, i.e. it is not in use in QPR Portal. |
| 2. | Select the series you want to modify. The series that can be edited manually (i.e. their Input Type is "Value is typed in" or "Value is typed in (restricted)") appear in the list with a white background. After selecting the series, input the desired value into the field. If you want to list only those series that are editable, select <All series without formulas> from the Series drop-down menu. |
Note: You can enter multiple values simultaneously for example by copying multiple cells from a Microsoft Excel sheet and pasting them into the selected column. Note that the direction of the columns must match even if there is only one editable series in the list, so if you are going to copy a row from Excel and input that row for one single series, you will have to use the Transpose Table option to get series listed as rows.
Note: If the element uses a date type measurement unit, the input format must be the same as the system locale date format or the ISO standard date format (yyyy-mm-dd hh:nn:ss). In addition, to input milliseconds you need to separate them with the decimal symbol defined in the system locale settings. For example, the input format could look like this: yyyy-mm-dd hh:nn:ss,zzz (where the comma is the decimal symbol defined in the system locale settings).
Note: If you input URLs as values into the text type series, the URLs will be clickable in QPR Portal if the URL has http://, https://, or ftp:// as its protocol identifier and if the 'Enable hyperlinks for text values' setting is enabled in QPR Configuration Manager.
Setting Status for Values
If status control has been enabled for a series (this can be done in the Series Properties dialog), you can define the value's status by right-clicking the value and selecting the desired status option from the Status menu in the pop-up menu that opens. Note that you can set status for many values at once by holding down the Shift or Ctrl key while selecting the rows of the values for which the status will be set.
Recalculating Values
The Recalculate button can be used to recalculate values for selected series and selected periods. The Recalculate All button recalculates values for all non-locked series and periods. In addition, administrators can recalculate specific locked periods by selecting them and clicking Recalculate. A confirmation will then be asked before the values are recalculated.
Deleting Values
To delete a value simply select a value an click the Delete key on your keyboard. Note that you can delete many values at once by holding down the Shift or Ctrl key while selecting the rows of the values to be deleted.
Pop-up Menu of the Values Tab
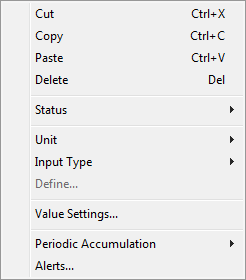
By right-clicking anywhere on the Values tab, you can open the pop-up menu from which the following options are available. Note that for values you need to right-click over the desired value.

Cut Select this option to cut the value of the current cell(s) to the clipboard.
Copy Select this option to copy the value of the current cell(s) to the clipboard.
Paste Select this option to paste a value to the current cell(s) from the clipboard.
Delete Empty the current cell's contents.
Status ![]() Change the status of the selected value(s).
Change the status of the selected value(s).
Unit ![]() Change the unit of the series the selected value belongs to.
Change the unit of the series the selected value belongs to.
Input Type ![]() Change the input type of the current series. In the case the new input type is Formula or SQL Import, an editor for defining a formula or settings for import is displayed. See the Formula Window section or the Import Data section for more information about defining formulas and import settings.
Change the input type of the current series. In the case the new input type is Formula or SQL Import, an editor for defining a formula or settings for import is displayed. See the Formula Window section or the Import Data section for more information about defining formulas and import settings.
Define... Define settings for the selected input type. For example, allows you to define a formula in the case the selected input method is formula.
Value Settings... Opens the Value Settings window for modifying the value settings.
Periodic Accumulation ![]() Change the periodic accumulation options of the series the selected value belongs to.
Change the periodic accumulation options of the series the selected value belongs to.
Alerts... Opens the Alerts window for defining alerts.
See Also