|
|

Working with Elements in the Scorecard Navigator |

|

|

|
||
Working with Elements in the Scorecard Navigator |
|
|
|

|
|
|
Working with Elements in the Scorecard Navigator |
|
|
|
||
Working with Elements in the Scorecard Navigator |
|
|
|
|
|
|
||
Edit or View Element Properties
![]()
The Pop-up Menu
Right clicking a tree element opens the context pop-up menu, which allows you to edit the element and add new elements, among other things. The contents of the menu varies according to an element which you have clicked. To learn more about the menu, see the Element Pop-up Menu of the Scorecard Navigator topic.
Create New Elements
To create a new element or information item, do the following:
| 1. | In the case the Tool Palette is visible, select the desired element from the Elements section and drag-and-drop it over some element in the Navigator. The new element is added a child element for the element over which the new element was dropped. |
| or |
| 1. | Select an element/branch from the scorecard tree displayed in the Scorecard Navigator view. The selected element/branch will act as a parent element for the new element. |
| 2. | Click the New button, |
| 3. | A new element will be created under the element/branch you have selected as a parent. The type of the new element is the same with the parent element. |
| 4. | If you selected an information item as a parent element, the Information Item(s) window will open for creating a new item. See |
An alternative way to create a new element or information item is to use the pop-up menu:
| 1. | Select an element/branch from the scorecard tree displayed in the Scorecard Navigator view. The selected element/branch will act as a parent element for the new element. |
| 2. | Click the right mouse button to open a pop-up menu. From the menu select Create New |
| If you want to create an information item, select Create New |
| 3. | A new element will appear below the element/branch you have selected as a parent element. Rename the element which you have created. |
| 4. | If you selected an information item creation from the menu, the Information Item(s) window will appear for creating a new information item. See Information Items Window for more information on creating a new information item. |
![]()
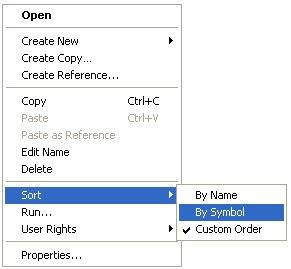
Sorting Elements
To sort elements in the hierarchy, select the Sort item from the pop-up menu (the menu can be opened by right-clicking the navigator area) of the hierarchy tree. There are three sorting options available:
| 1. | By Name (default). When this option is selected, elements of the same hierarchy level are automatically sorted in an alphabetical order. If measure elements are references with the same name from different scorecards, they are sorted by their original scorecard according to the sorting option set for those in the Model Navigator. If there are still measure elements exactly with the same name, they are sorted by their identifiers. |
| 2. | By Identifier. When this option is selected, measure elements of the same hierarchy level are automatically sorted in the alphabetical order of their identifiers. Elements that have no identifier (linked elements, information items) are sorted by their names alphabetically. |
| 3. | Custom Order. When this option is selected, elements are not sorted automatically. However, you can sort measure elements by dragging and dropping them on their parents – if a measure element is dragged with the mouse and released over its parent, it is moved as its last child in the hierarchy. You can also move elements and information items freely to different locations in the hierarchical structure. Grab the item which you want to move with the left mouse button, drag it to the new location and release the mouse button to drop it there. |
The sorting order set this way is saved to the QPR Metrics Server and applied to the element hierarchy in all scorecards of the current model. The analysis view for all scorecards of this model in QPR Portal uses the same sorting order too.
![]()
Copy or Reference Elements
For information on copying or referencing elements, see Copying and Referencing Elements.
Delete Elements
To delete any element displayed on the view, do the following:
| 1. | Select the element to be deleted. |
| 2. | Press the Delete key or right-click and select Delete from the pop-up menu. A confirmation window opens, asking you if you really want to delete the selected element. |
| 3. | Click Yes. The element symbol is removed from the Scorecard Navigator. If the element was originally created in the scorecard you are working with, the element itself and all its sub-elements are permanently deleted from the model. |
This procedure can also be used to delete the scorecard![]() itself from the model. Remember that all information associated with the scorecard is also deleted.
itself from the model. Remember that all information associated with the scorecard is also deleted.
If the element symbol that you delete is owned by another scorecard, it is removed from the active scorecard, but still remains in its scorecard of origin.
Rename Elements
To rename an element, right-click the element and select Rename from the pop-up menu. The label of the element turns into an input field where you can enter the new name.
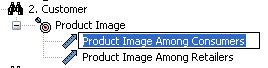
![]()
Activated label waiting for user to enter a new name.
An alternative way for renaming an element is to first select it and then clicking the element label with the left mouse button. This will turn the label into an input field where you can enter the new name.
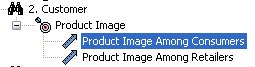
Selected element.
Edit or View Element Properties
To edit or view element's properties, right click an element and select Show from the pop-up menu. This will open the Element Properties![]() , Strategy, Vision, or Information Item window, depending on what type of an element you have summoned the menu and selected the Show option.
, Strategy, Vision, or Information Item window, depending on what type of an element you have summoned the menu and selected the Show option.
Set User Rights
For every user and user group, you can define access rights to the individual model elements. For instructions on how to set user rights, see Setting Rights to Objects and Branches.